
Moving BlogEngine.NET to Azure Web Sites
Published on Friday, October 4, 2013 11:03:04 AM UTC in
Tools

As a result of the recent meltdown of my web sites I finally decided to gradually move everything to more reliable places, starting with migrating my blog to an Azure Web Site. I'm running the blog on BlogEngine.NET and even though moving an existing installation to Azure is not that complicated, there are a few minor things to consider and to take care of, all of which I describe in this post. What I describe is also interesting for those that simply want to move their blog to a different (sub) domain or folder and make sure everything will work as before.
Please note that this post deals with the file-based version of BlogEngine.NET. If you are running your blog on top of a database, you also need to move your database, which I don't describe here.
When you look for pointers where to start with this, you will most likely stumble upon a section of the official documentation that describes how to run BlogEngine.NET on Azure. I deliberately do not link that section here as according to the comments it's outdated and only partially working, and it focuses on running the blog as cloud service (former web role), which is not what we want.
Important note: before you start with any of the steps, make sure you have backups of everything. I do not take responsibility for any loss of data, and I do not guarantee that what I describe here will work for each and every situation. Your mileage may vary, so make sure you're prepared to roll back if something goes wrong.
Create a Clean Install
The first thing I did was create a new Azure Web Site using the BlogEngine.NET package. You could also start by download the install package from the BlogEngine.NET page on CodePlex and create everything from scratch, but it's a lot quicker to let the Azure management portal do the work and set up everything for you. This also ensures that the installation will run smoothly on Azure without further manual investigation.
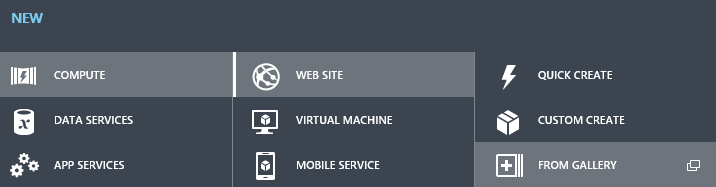
Create a Web Site from the gallery instead of starting with a blank one
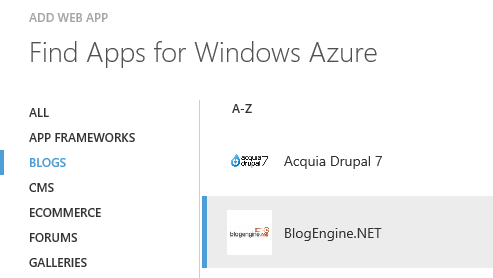
BlogEngine.NET in the Windows Azure Gallery
After you've completed the installation, make sure that everything went ok and you are able to access the newly created blog in your browser. After that, you can download the existing installation to your local computer using FTP. To enable FTP access, you first have to create some credentials for that on the dashboard page of your web site in the Azure management portal.
Once downloaded, the last step would be to enable the installation to be hosted in your local IIS for testing, which is simply done by creating a new web application in IIS manager which points to the folder the downloaded files reside in. Make sure that the assigned application pool corresponds to the correct .NET version required for the blog.
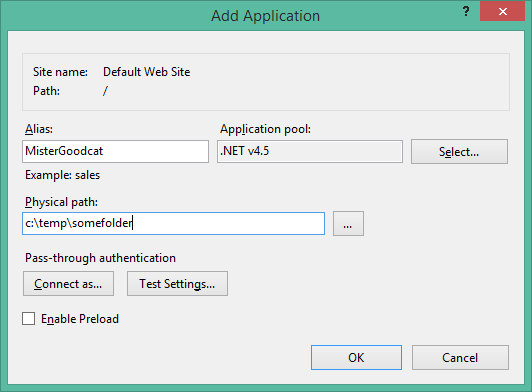
Depending on your local configuration, you may also need to install IIS first or add missing components to it, using the system's "program and features" dialog.
You could of course skip this whole "local install" procedure and simply perform all following steps by uploading changed files etc. directly to Azure; I however like to have a full copy and running installation on my local machine to do the testing beforehand, and I also keep those installs around and continue to sync them later as some sort of additional backup.
Migrating your data
Before you start the migration, make sure that the source version (of your existing blog installation) matches the target version that you downloaded from Azure. Do not try to bite off more than you can chew and do a migration and version update at the same time; instead, you should first update the source installation to the correct version following the official procedures, and then start the actual migration.
The nice thing about BlogEngine.NET is that it keeps all your data in one place, so it's quite easy to move it around and not forget anything. That single place is ASP.NET's App_Data folder. When you take a look at its contents, you will find a bunch of XML files that contain all sorts of meta data, the most important ones being:
- blogs.xml: contains the definitions of your blogs. If you're only using one blog there will be only one single entry.
- roles.xml and users.xml: the users and their associated roles; if you're running a blog only for yourself there's probably only a single entry in these.
- settings.xml: the most important file that basically contains all configuration settings of your blog that you can typically edit in the administration backend.
In addition to these files, there are also a lot of folders containing the actual data (and, in some cases, more meta data):
- datastore: additional configuration settings for extensions and widgets. For example, if you're using the ReCaptcha plugin, the corresponding XML file will contain your custom configuration for it.
- files: contains all the uploaded files for your posts and articles, which mostly are images, but may also be attached files like zip archives and more.
- pages: all the static pages that you have in your blog installation. For my blog, these are the info pages about myself and my projects that are linked at the top, for example.
- posts: just what it says; contains all the posts of your blog.
- profiles: the user detail data, containing for example the avatar url and more. If you followed the advice during the BlogEngine.NET installation and deleted the admin user you'll most likely only have one single file here, unless of course you're working with multiple users.
The simplest thing to do to move everyting to your new installation is to copy over all the content from the App_Data folder to the new location. Personally I like to be a bit more selective and leave out some unnecessary data, like the CompliationSnapshots and monstercache folders as well as for example the logger.txt file in the folder's root.
… and the rest
What's not included in the App_Data folder obviously is all of the customizations you potentially added the site's design. In my case for example, over the years I took various themes and created copies so I could safely introduce my own changes to them – different CSS styles, structural changes and also replacing various images and adding custom JavaScript. These files are located in the themes folder of your installation root, and in the actual theme's sub folder, respectively, so you need to bring them over to the new location also.
Fixing Stuff
Depending on how your migration looks like, quite some details may be broken after the above steps. Let me give you some examples for problematic scenarios:
- You move your blog to a different domain, e.g. from www.example.com to www.example2.com
- You move your blog to different sub domains or folders, e.g. from www.example.com/blog to www.example.com/blog2
- A combination of these – this is what I did: I migrated the blog from http://www.pitorque.de/MisterGoodcat to http://www.mistergoodcat.com
The problem here is that tools like Live Writer generate absolute URLs for automatically uploaded files like images, meaning your posts now contain all sorts of hard-wired links to your old domain and/or folder structure. You may also have introduced absolute links yourself manually when you referenced other articles or files in a post. This is a subtle problem because during your tests this will hardly surface: when you look at the migrated posts everything looks fine because e.g. the image links point to the old location and the data is simply pulled from there. It's only when you turn off the old hosting location that suddenly hell breaks loose and all sorts of things break.
What you can do to solve this is use a "replace in files" approach and fix all the existing links of your posts and articles. Since they all are simple XML files, you can use whatever tool you like for this. My tool of choice is PowerShell. Let me give you an example; on the PowerShell command line, navigate to the posts folder that contains your migrated data (again: make sure you have a backup before you start) and do something like:
Get-ChildItem .\*.xml
   | ForEach-Object { (Get-Content -Encoding UTF8 $_) -replace '"http://www.pitorque.de/MisterGoodcat/','"'
   | Set-Content -Encoding UTF8 -path $_ }
What this does is iterate all the XML files in the folder, read the content using UTF8 encoding, and replace the string "http://www.pitorque.de/MisterGoodcat/ with just double quotes and finally write back the changed contents to the original file. This turns absolute image links in e.g. href-attributes into relative ones that now directly point to the right image.axd handler and hence work off of your new location correctly.
I used a bunch of these commands to clean up the data and to replace references to my old domain with the new ones until a "find in files" didn't return any hits anymore, and my tests with the local install were successfull.
Don't Break Existing Links
One final thing to consider is that when you move your blog to a different location as described above you want to provide your users with a nice and graceful experience too. The worst thing to do is simply turn off the old location, which will result in lots of 404 errors and frustration for your users. The absolute minimal solution you would want to do is forward everybody to the root of your new location, so they at least do not receive any errors when they're trying to access old URLs. There's a much better way however.
Since your content doesn't really change when you move your blog, and all the posts continue to use the same slug as before, you can create a very simple yet effective mapping that allows to properly forward your users to the exact post or article they came looking for in the first place. Consider my scenario. Something like
http://www.pitorque.de/MisterGoodcat/page/My-Projects.aspx
became…
http://www.mistergoodcat.com/page/My-Projects
Now that looks quite similar, does it? What you can see are two things that have changed: in addition to moving the blog to a new location, I also enabled BlogEngine.NET's feature to truncate the file extension, meaning that the old ".aspx" extension is not present in the new location anymore.
The easiest way to create a proper mapping for this is to use the rewrite features of IIS (note: depending on your hosting environment you may have to separately enable this or ask your provider to do it for you). The concept behind this is that you can add patterns (regular expressions) to your IIS configuration that are applied to incoming requests. If matched, you can then decide what to do with the requests, for example forward them to the proper new location. In my case, what I did was put a web.config file into the root folder at the old location, and add the following two rewrite rules to it:
<rewrite>
    <rules>
        <rule name="Forward to mistergoodcat.com" >
            <match url="^MisterGoodcat/(.*)\.aspx$" ignoreCase="true" />
            <action type="Redirect" url="http://www.mistergoodcat.com/{R:1}" redirectType="Permanent" />
        </rule>
        <rule name="Forward to mistergoodcat.com without extension" >
            <match url="^MisterGoodcat/(.*)" ignoreCase="true" />
            <action type="Redirect" url="http://www.mistergoodcat.com/{R:1}" redirectType="Permanent" />
        </rule>
    </rules>
</rewrite>
Let me translate that for you: the first rule matches all incoming requests for URLs starting with "MisterGoodcat" and ending with ".aspx". The action to perform for these requests is to redirect to the new location, assembling the proper URL from the new domain name and the matched parts in parenthesis (note that this doesn't contain the .aspx extension!). The redirect type is set to "permanent", resulting in a 301 response from the server (indicating that the content has permanently moved to a new location). The second rule does the same but matches requests without the .aspx extension.
This nicely forwards users that try to access the old links to the proper new location, because all browsers will process the 301 response and automatically do another request to the given new URL.
I hope this helps some of you moving your BlogEngine.NET installation to an Azure Web Site and/or to a new location easily; in a second post I will discuss some more general aspects of this move, like using custom domain names and how to get email working properly with Azure Web Sites.
-Peter
Tags: Azure · BlogEngine.NET · IIS · PowerShell · Web Sites