TextBox Validation Template for Windows Phone
Published on Monday, August 5, 2013 5:00:00 PM UTC in
Programming

Every now and then I want my text boxes in a Windows Phone project to show validation errors by using the magic that is provided by the binding engine and supporting interfaces like INotifyDataErrorInfo. When you try to do that as you would in e.g. WPF or Silverlight, the visual result is simply – nothing. Luckily, this irritating behavior is just caused by the involved default control template of the control on Windows Phone. All the infrastructure and the required logic in the control code are there, it' just that nothing is displayed because the required visual states are missing (for performance reasons).
A Solution
When you search for this problem on the web you will definitely find some solution for this easily. Most articles suggest to use a text block in the control template that binds to the first error in the validation errors collection that is then switched to visible in the respective visual state. Something like that:
<TextBlock Text="{Binding (Validation.Errors)[0].ErrorContent, RelativeSource={RelativeSource TemplatedParent}}" />
This works. However, when you use such a construct you will find that internally, it produces exceptions when no validation errors are present, simply because the binding tries to access a non-existent first entry all the time:

Although the runtime handles this gracefully for you and you don't have to worry about unhandled exceptions bubbling up to the surface, it can actually significantly degrade performance. And if you think about it, not having validation errors should be the normal case – it shouldn't be handled using exceptions as a flow-control solution at all.
A Better Solution
What I typically use therefore is a different approach. Instead of having a plain text block, I add in an items control that binds to the collection of validation errors. The item template in turn then has a text block to show the actual error messages. This construct avoids exceptions when there are no errors and hence can be used without any danger even multiple times on the same page. Here is the XAML for that part; simply place it in the text box's control template where you think it fits best (e.g. below the content control):
<ItemsControl x:Name="ValidationErrorList"
              Grid.Row="1"
              Visibility="Collapsed"
              Margin="12 -10 12 12"
              DataContext="{Binding RelativeSource={RelativeSource TemplatedParent}}"
              ItemsSource="{Binding (Validation.Errors), BindsDirectlyToSource=True}">
    <ItemsControl.ItemTemplate>
        <DataTemplate>
            <TextBlock x:Name="ValidationText"
                       TextWrapping="Wrap"
                       FontSize="{StaticResource PhoneFontSizeNormal}"
                       Foreground="#ff0000"
                       Text="{Binding ErrorContent}">
            </TextBlock>
        </DataTemplate>
    </ItemsControl.ItemTemplate>
</ItemsControl>
To make this fully work, you need to toggle its visibility in the correctly named visual states, so you have to add the following to the visual state manager's visual state groups:
<VisualStateGroup x:Name="ValidationStates">
    <VisualState x:Name="Valid"/>
    <VisualState x:Name="InvalidFocused">
        <Storyboard>
            <ObjectAnimationUsingKeyFrames Storyboard.TargetName="ValidationErrorList"
                                            Storyboard.TargetProperty="Visibility">
                <DiscreteObjectKeyFrame KeyTime="0">
                    <DiscreteObjectKeyFrame.Value>
                        <Visibility>Visible</Visibility>
                    </DiscreteObjectKeyFrame.Value>
                </DiscreteObjectKeyFrame>
            </ObjectAnimationUsingKeyFrames>
        </Storyboard>
    </VisualState>
    <VisualState x:Name="InvalidUnfocused">
        <Storyboard>
            <ObjectAnimationUsingKeyFrames Storyboard.TargetName="ValidationErrorList"
                                            Storyboard.TargetProperty="Visibility">
                <DiscreteObjectKeyFrame KeyTime="0">
                    <DiscreteObjectKeyFrame.Value>
                        <Visibility>Visible</Visibility>
                    </DiscreteObjectKeyFrame.Value>
                </DiscreteObjectKeyFrame>
            </ObjectAnimationUsingKeyFrames>
        </Storyboard>
    </VisualState>
</VisualStateGroup>
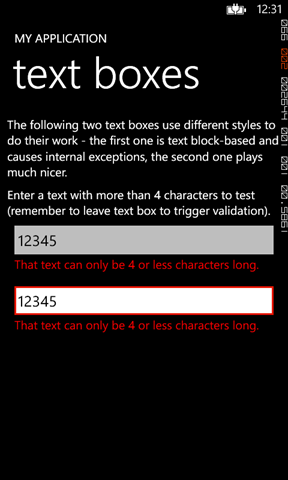
If you're having trouble putting it all together, don't worry – you can download a sample project with the complete style down below. It comes with the two explained approaches so you can test both. Although they do produce the same visual output, their internal behavior is quite different (in the emulator and with the debugger attached, you can even feel the difference because it takes time to bring those exceptions across to Visual Studio's output window):

Of course this technique can be applied to other controls as well, for example the password box.
Download sample: VS2012 solution (54 kbyte)
Have fun!
Tags: Windows Phone
