
Protocol of developing an animation texture tool
Published on Saturday, December 11, 2010 9:50:00 AM UTC in
Programming

Yesterday I wanted to create some animations for a Windows Phone 7 XNA project I'm working on, and I came across the problem that I wanted to put several frames of that animation on a single texture. This is a well-known technique in game programming to optimize performance compared to having single textures for each frame. Here is a cutout from the official Catapult Wars sample project to give you an idea. In the game, those frames are shown one after another at high speed, creating the illusion of an animated object. If you're familiar with game programming, this shouldn't be of any news to you.

Unfortunately the software I'm using only has the ability to export image sequences, not those kinds of textures. So I spend some time looking for alternative tools, but all of them had some disadvantages, for example lacking support for the required file formats, or they couldn't handle transparency correctly. One of the tools actually worked quite well, however the author unfortunately had spend more time on creating a custom window and a skinned UI than on usability. Filenames longer than 16 characters were cropped in the software due to a fixed size layout (not even scrollbars), which made for example manual reordering based on the filenames impossible in that cases.
When I got up an hour ago I started thinking about my requirements for such a software, and I came to the conclusion that it must be pretty simple to build one myself in no time. A minute later I had another crazy idea: I always praise Silverlight for it's capability of creating applications rapidly. Why not challenge myself and build that tool in, let's say, less than three hours? One thing led to another, and now I welcome you to the premiere of an "application creation diary blog post". At the moment I'm writing this, I haven't written a single line of code yet and the idea to make the application is less than half an hour old. Read on for a step-by-step log about the development, as I plan to write down each step as I'm doing it. But first let me grab some more coffee :-).
2010-12-11 10:45 am: Addendum
After the project was finished (and before posting this article) I added the screenshots, code snippets and links and fixed some typos and clumsy sounding paragraphs. The major part has been written during the development and stays untouched though.
2010-12-11 6:50 am: The start
First I will create the project in Visual Studio, set up the needed references and basics. I know this is going to be a client-side project where I don't need any kind of web service (at least for the moment), so making the tool should be even easier. I want to create it as an MVVM style project with the MVVM light framework. Let's go!
2010-12-11 6:52 am: Solution and required environment set up
Ok, setting up the project wasn't a real challenge, as MVVM light comes with pre-built templates for everything. I've also added references to some files from the WriteableBitmapEx project as I have a feeling I will need them for faster/better blitting and image manipulation.
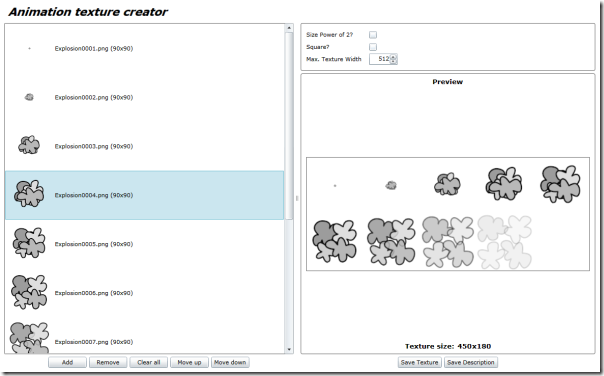
Now I'm going to layout the main UI. I want to show the list of loaded images in a list box at the left side of the screen. The right side should contain some options to influence the creation of the final texture, a preview of the result, and a button for saving it to the local hard disk.
2010-12-11 7:05 am: UI prototype finished
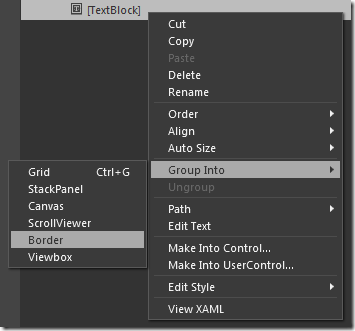
Blend is not easy to master, but once you're used to it, it's such an impressive tool. Designing the UI prototype took less time than I had expected. I really like how you can restructure large parts of the UI as you go, and how Blend often does really intelligent stuff (like carrying over the grid row/column or margin settings when you use the "group into" feature). It also has some bad habits though. At one point it decided to set the height values of half a dozen elements to a fixed value of zero, which I really didn't understand and realize at first.
I now have the basics finished, with the panel containing the texture creation options and of course all bindings still missing. I'm now going to create some properties in my view model and additional classes that aid me with selecting and manipulating the source images.
2010-12-11 7:24 am: Loading the source images works
Ha, I ran the application for the first time and was able to load some images from disk. To this end, I created a small helper class that holds the source images which I can use for bindings in the list box item template. I've also created a command that loads the images and is invoked when someone clicks the "Add" button.
I got distracted for a moment when I realized that what I did was not very MVVM'ish. In a thoroughly planned application, I would not call a file open dialog from my view model, but from code behind. Maybe I'll have some time left for refactoring in those three hours (or maybe I'm already starting to go crazy :-)). Now I'll implement the rest of the buttons functionality, like removing the selected item and manual reordering of the source images.
2010-12-11 7:48 am: Dealing with the sources finished
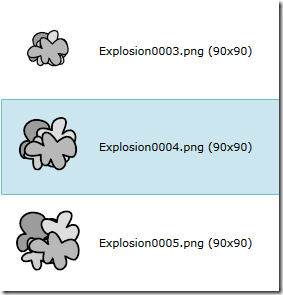
The part dealing with the source images is done. I only ran into some minor problems, for example that the selection was lost after manually reordering items, but I could fix all of these issues very quickly. Now it's possible to import multiple images (they are initially sorted by the file names), manually reorder them in the list, and remove a single or all images. The next step is to start writing the helper class that puts these images together into the final texture.
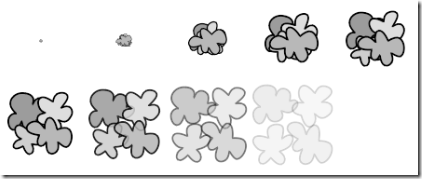
2010-12-11 8:08 am: The first texture has been created
The first working version of the texture creator is finished. It puts the source images onto a texture with enough space for all frames, the result is shown as a preview in the UI. At the moment, the texture creator makes the size of the texture a power of 2. I see how this can be improved later on by tightly packing the frames to avoid wasting space. For now however, I want to focus on the feature to export the final texture.
2010-12-11 8:25 am: Unexpected difficulties and a surprisingly quick solution
When I tried to write a save method for the final texture, I realized that Silverlight has no built-in support to write PNGs. I never had the need to do that, so this really catched me off guard. Luckily, searching the web brings up a lot of solutions to this. I chose the ImageTools library on Codeplex. Their API looked simple, it got excellent user ratings and is actively developed - perfect. Adding the references to the library and encoding the finished texture as PNG took less than three minutes. Thank you guys!
using (Stream stream = dlg.OpenFile())
{
    // create an image tools image first
    ExtendedImage image = TextureResult.Texture.ToImage();
    PngEncoder encoder = new PngEncoder();
    encoder.Encode(image, stream);
}
The next step is to add in some options to influence the creation of the final texture a bit. For example, I want to be able to create the final texture in non-square formats and tightly pack the frames instead of wasting space by using powers of 2 as size constraints.
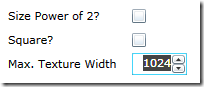
2010-12-11 9:08 am: Texture creation options finished
Implementing the options was quite straight forward, both in the UI and in code. I only had to fix two little bugs when I tested the results. The user can now choose whether they want to make the size of the texture a power of 2 and whether it should be square. If the user doesn't require a power of 2 texture size, they can restrict the maximum width of the texture, so the frames are wrapped into multiple rows when that size limit is reached.
Regarding the UI I've added some checks to see if the commands actually can execute, and wrote an "invert boolean" value converter (for the millionth time I think) to disable a numeric up-down element with an element to element binding.
One thing missing now is the information about the frame layout in the texture. The XNA learning samples you can download use an Xml format to describe the animations, and I thought it would be nice if the application could output a similar format. At least the geometric information about the frame layout can be determined during the creation process. Let's add that!
2010-12-11 9:24 am: Meta information can be saved
Linq to Xml - you gotta love it, right? The application can now safe an Xml description of the created texture, like the original names of the frames and their offsets and sizes within the final texture.
<?xml version="1.0" encoding="utf-8"?>
<Animation>
  <Frame Id="0" Name="Explosion0001" X="0" Y="0" Width="90" Height="90" />
  <Frame Id="1" Name="Explosion0002" X="90" Y="0" Width="90" Height="90" />
  <Frame Id="2" Name="Explosion0003" X="180" Y="0" Width="90" Height="90" />
  <Frame Id="3" Name="Explosion0004" X="270" Y="0" Width="90" Height="90" />
  <Frame Id="4" Name="Explosion0005" X="360" Y="0" Width="90" Height="90" />
  <Frame Id="5" Name="Explosion0006" X="0" Y="90" Width="90" Height="90" />
  <Frame Id="6" Name="Explosion0007" X="90" Y="90" Width="90" Height="90" />
  <Frame Id="7" Name="Explosion0008" X="180" Y="90" Width="90" Height="90" />
  <Frame Id="8" Name="Explosion0009" X="270" Y="90" Width="90" Height="90" />
  <Frame Id="9" Name="Explosion0010" X="360" Y="90" Width="90" Height="90" />
</Animation>
One annoying little detail was that I actually ran into Silverlight's "dialogs must be user-initiated" restriction. I wanted to open a second save file dialog after the texture is written to disk, but naturally the time span between the initial button click and that point in time is way to long to be still accepted as user-initiated. For the moment I have added another button, so the user has to save the texture and description separately.
Since I have more than enough time left until the three hours limit is reached, I now want to refactor some details and add some additional checks to avoid and/or handle exceptions.
2010-12-11 9:58 am: Polished and cleaned up
I have now moved the file selection dialog to the code-behind file to achieve a cleaner separation between the view and my view model. I've also added a UI element that binds to an error property in the view model. For each user-initiated operation, the view model handles exceptions and other errors and logs them so the UI can show them to the user. During a test I ran into a situation when the creator is not able to create a texture due to the size constraints set by the users. I identified a second constellation where that happens, and both of which are now handled gracefully.
With this step, the application is functionally finished. It still looks a bit ugly, and of course it's missing some points of a really solid application - there's no design-time data and no unit testing, for example. I also had ideas for half a dozen additional features as I went through the development; but as a "1.0" version it's really not bad and does what I wanted it to do, and best of all it doesn't have the limitations of the tools I've looked into before.
Conclusion
When I look at the current time I see that my estimation was not bad at all. I needed slightly more than three hours to get to this state, but keep in mind that I also wrote large parts of this text during that time. Without that, I would've most likely needed around two and a half hours (keep in mind that English is not my native language and I'm actually a bit slow typing English text :)). Also, I spent the last half an hour with polishing and UI tuning; most of that wasn't necessary for the correct functioning of the application. So once again I'm amazed how quickly you can produce results with Silverlight. I really love this platform.
I'll upload the application and the full source code in a follow-up post, after I've cleaned the code a bit more and added some more comments to the source (yes, "more" - I even added some comments to crucial parts right away; ain't I a good boy :D).
Tags: Silverlight · Windows Phone 7 · XNA