
A highlighting AutoCompleteBox in Silverlight
Published on Wednesday, March 9, 2011 3:18:00 PM UTC in
Programming

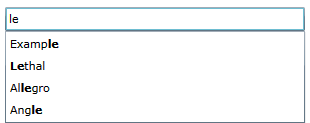
Some days ago someone in the Silverlight forums asked about how an auto-complete box that highlights the matched parts of potential hits could be made. Something like:
There is no built-in feature for this in the AutoCompleteBox and I didn't have a simple answer to that question. However I found it an interesting topic and a useful feature, so I decided to put some research in it as soon as I have some time. As it happens, I just had that time, and the result is this blog post :-). As always you can download the full source code at the end of the post.
Preliminary consideration
When I thought about the problem and the fact that you can put virtually everything into an auto-complete box item (it fully supports data templates for its items, see my article on the control here), I realized that this cannot be an extension of the control itself, but has to be a separate element, like a custom text block that can be used within the item template of an auto-complete box. At first I wanted to do exactly that, create a custom text block, but that class is sealed; so I had to use a user control that wraps a text block instead. Here is what I did.
A custom text block user control
The idea was to use multiple runs in a single text block, with a font weight of bold for the highlighted parts, and normal runs for the rest. To this end, the item text potentially needs to be split into several fragments first. To accomplish this, the following pieces of information are needed:
- The text to process.
- The filter string.
- The filter mode the auto-complete box is using.
Obviously all of this has to come from the auto-complete box control, so the user control I created has dependency properties, one for each of these three pieces, that can be used for data binding in XAML to retrieve these values automatically. Like that:
<sdk:AutoCompleteBox x:Name="ContainsAutoCompleteBox"
                     ItemsSource="{Binding Items}"
                     Width="300"
                     FilterMode="Contains"
                     MinimumPrefixLength="2">
    <sdk:AutoCompleteBox.ItemTemplate>
        <DataTemplate>
            <StackPanel Orientation="Horizontal">
                <local:HighlightingTextBlock Text="{Binding}"
                       HighlightedText="{Binding Text, ElementName=ContainsAutoCompleteBox}"
                       FilterMode="{Binding FilterMode, ElementName=ContainsAutoCompleteBox}" />
            </StackPanel>
        </DataTemplate>
    </sdk:AutoCompleteBox.ItemTemplate>
</sdk:AutoCompleteBox>
Note how I use element binding to retrieve the text the user currently has typed in as well as the current filter mode from the auto-complete box.
The logic within the user control is pretty simple: whenever one of the three properties changes, the content of the inner text block is recreated.
private void BuildText()
{
    // clear all content
    RootText.Inlines.Clear();

    // split the text into highlight text parts
    var parts = AutoCompleteHighlightingSplitter.Split(Text, HighlightedText, FilterMode);

    foreach (var part in parts)
    {
        // depending on the highlighted flag, create corresponding runs
        if (part.IsHighlighted)
        {
            AddBold(RootText, part.Text);
        }
        else
        {
            AddNormal(RootText, part.Text);
        }
    }
}
I've written a custom splitter helper class that inspects the three properties and returns a collection of "highlight parts", a type that really only contains the text and an IsHighlighted flag for each fragment:
/// <summary>
/// Contains a text fragment from a split operation.
/// </summary>
public class AutoCompleteHighlightingSplitPart
{
    /// <summary>
    /// Gets the text of the fragment.
    /// </summary>
    public string Text
    {
        get;
        private set;
    }

    /// <summary>
    /// Gets value indicating whether this fragment is to be highlighted.
    /// </summary>
    public bool IsHighlighted
    {
        get;
        private set;
    }

    /// <summary>
    /// Initializes a new instance of the
    /// <see cref="AutoCompleteHighlightingSplitPart"/> class.
    /// </summary>
    /// <param name="text">The text of the fragment.</param>
    /// <param name="isHighlighted">if set to <c>true</c>
    /// the text fragment should be highlighted.</param>
    public AutoCompleteHighlightingSplitPart(string text, bool isHighlighted)
    {
        Text = text;
        IsHighlighted = isHighlighted;
    }
}
Depending on the IsHighlighted flag, runs are then created accordingly:
private void AddBold(TextBlock textBlock, string text)
{
    // adds a bold run
    // inherits all other properties from the parent
    Run run = new Run();
    run.FontWeight = FontWeights.Bold;
    run.Text = text;
    textBlock.Inlines.Add(run);
}

private void AddNormal(TextBlock textBlock, string text)
{
    // add a normal run
    Run run = new Run();
    run.Text = text;
    textBlock.Inlines.Add(run);
}
Looks pretty simple, doesn't it? The only missing detail is the logic of the splitter.
The auto-complete highlighting splitter
The only public method of this helper class is the Split method used above, which takes the text, the value to search for and the filter mode as arguments and returns the list of split parts after processing. There are several possibilities here:
- If the text is empty, the returned list is empty.
- If the search value is empty, the returned list contains one part with the whole non-highlighted source text.
- The same happens when the filter mode is set to "None".
- If the filter mode is set to "Custom" an exception is thrown, because we do not know the required logic to split the source text in this case.
- If the filter mode is set to one of the "Equals" values, the processing is trivial and only contains the whole text flagged as highlighted.
- For all other modes (the "Contains" and "StartsWith" variants), two processing methods are sufficient, because each variant only differs in the used StringComparison value to determine matches (current culture, ordinal, and their corresponding "IgnoreCase" counterparts).
Let's look at the "Contains" split method as an example; it all is just a bit of string processing:
// use the current string comparison to detect a match
int index = text.IndexOf(value, stringComparison);

// does the text contain the value?
if (index >= 0)
{
    while (index >= 0)
    {
        // add first part
        if (index > 0)
        {
            var part = new AutoCompleteHighlightingSplitPart(text.Substring(0, index), false);
            parts.Add(part);
        }

        // add match
        var matchText = text.Substring(index, value.Length);
        var matchPart = new AutoCompleteHighlightingSplitPart(matchText, true);
        parts.Add(matchPart);

        // cut off the processed parts so far
        text = text.Substring(index + value.Length);
        index = text.IndexOf(value, stringComparison);
    }

    // add last part
    if (text.Length > 0)
    {
        var part = new AutoCompleteHighlightingSplitPart(text, false);
        parts.Add(part);
    }
}
else
{
    var part = new AutoCompleteHighlightingSplitPart(text, false);
    parts.Add(part);
}
If the search value was found (which always is the case if this is triggered by the auto-complete box filtering), we first add the non-highlighted part at the beginning of the text (if applicable), and then the highlighted match itself. When we're using the "Contains" mode it is possible that multiple matches are present in the source text, so we then simply cut of what we've processed so far and try to find the next match until no more matches are found. In the end, all remaining text (if any) is added as non-highlighted.
The "StartsWith" variant works similarly, but since there's only one match at the beginning of the source text its logic is even simpler.
The result
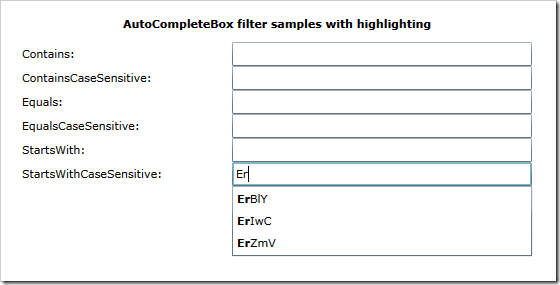
I've added a small demo application to the sample solution that creates a list of random strings and several auto-complete boxes with their filter mode set to different values for testing.
In the end I found this nice solution much quicker than I thought and turned it into some code I can reuse and extend later if required. I hope you find it equally handy. You can download the complete solution here:
Tags: Controls · Silverlight