
Silverlight for keyboard junkies
Published on Friday, February 4, 2011 10:55:00 PM UTC in
Programming

If you are like me, you like using the keyboard for navigating around in and between applications, and to use shortcuts for common (and not so common) tasks. For example, I've memorized a lot of the shortcuts in Visual Studio, because often it's so much faster to use them than to move your hands away from the keyboard and navigate through multiple menu levels using the mouse. I also make heavy use of standard navigation features in data entry forms, especially the tab key. Unfortunately, when you build a Silverlight application, and in particular when you're using items controls like the list box for data entry scenarios, the default behavior is a bit annoying and requires quite some work for a smooth user experience. Here's how to do it.
Update: As Wolf Schmidt kindly points out in his comment below, the default behavior of these controls in Silverlight is the same as in other web applications (and, for that matter, desktop applications), and I'm putting some effort into changing this into something you would not expect from a normal list box. Let me emphasize that I do not suggest to change the default behavior for normal item controls to what is described here. My intention was to turn the user experience into something one would expect when the list box is used as a replacement for a normal data entry form as described above (where you use the tab key to move from field to field).
The problem
Let's take a common situation to see what the actual problem is. First of all we need a simple data class we can use for our items, like this:
public class SampleData
{
    public string SomeText
    {
        get;
        set;
    }
}
It's really that simple. All we need to have is a single string per item that we potentially can edit using a text box. Next thing we do is define a list box and create the appropriate item template for it, like this:
<ListBox ItemsSource="{Binding Data}"
         Margin="20"
         Width="200"
         Height="400">
    <ListBox.ItemTemplate>
        <DataTemplate>
            <TextBox Text="{Binding SomeText, Mode=TwoWay}"
                     Width="100" />
        </DataTemplate>
    </ListBox.ItemTemplate>
</ListBox>
The "Data" property used for data binding of the items is a mock-up property in the view model that contains some auto-generated test data. When you run the sample, you'll see something like this:
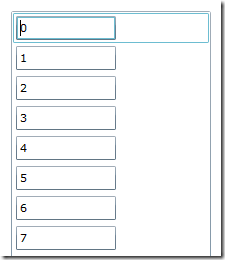
When you play around with this you'll realize that the tab key doesn't seem to do anything. When you tab once, the text box of the first item gains focus (like in the screenshot), tab a second time and it loses focus. The tab key doesn't move you to the next item. You need to use the arrow keys (or home/end, page up/down) to move between the items. You'll also realize that when you move the selected item using the arrow keys and then tab, you first get the expected result (the text box of the selected item receives focus), but if you repeat that process, the focus is reset to the first item in the list. That's pretty impractical.
First improvements
One property surprisingly few developers know about is the TabNavigation property of the control class. It determines how the tabbing behaves within a container. Apparently the default value for the list box is "Once", which means focus is given to the container and all its children only once. Then focus moves on to the next sibling of that container. You can verify that if you put a sample button or another control next to the list box onto the same level of the page.
The other two options Silverlight provides are "Cycle" and "Local". Both allow you to actually cycle through the individual list box items. The difference is that "Cycle" will not move focus to the next sibling of the list box once the end is reached, but immediately jump to the first item again. "Local" on the other hand will move the focus to the next sibling when the end of the list is reached (for example the sample button I just suggested for testing).
That sounds exactly what we need, right? Let's try it:
<ListBox ItemsSource="{Binding Data}"
         TabNavigation="Local"
         Margin="20"
         Width="200"
         Height="400">
    <ListBox.ItemTemplate>
        <DataTemplate>
            <TextBox Text="{Binding SomeText, Mode=TwoWay}"
                     Width="100" />
        </DataTemplate>
    </ListBox.ItemTemplate>
</ListBox>
Note the "TabNavigation" attribute which I set to "Local". When you try that you'll realize that it kind of works, but it's not very convincing. There are two problems here:
- You still have to hit the tab key twice for each item, because first the list box item itself is selected, and then in a second step the text box is focused.
- When the end of the visible part of the list box items is reached, the list box doesn't scroll. Instead it moves the focus to the next sibling of the list box ("Local") or back to the first list box item ("Cycle"). This is due to the built-in virtualization of the used default panel of the list box. There aren't really any list box items for the data that is outside the visible boundaries of the list box (or only very few), which means they cannot be focused.
Fixing the list box item
The first of the remaining problems can be fixed easily using styles. Behind the scenes, when you bind your data to the items source property of the list box, a container is created for each item (of type ListBoxItem). You can style this container with the ItemContainerStyle property of the list box. In our particular case, we want to set the IsTabStop property of the generated items to false so they are not considered when the user tabs through the items.
<ListBox.ItemContainerStyle>
    <Style TargetType="ListBoxItem">
        <Setter Property="IsTabStop"
                Value="False" />
    </Style>
</ListBox.ItemContainerStyle>
I'm not sure why the default value is true for the list box item, I have never needed that. The only benefit you get from it is that you can select the list box item using the space key when it has the focus. You lose this option when you set IsTabStop to false like we did above.
When you test the sample now you can iterate through the list box items and jump from text box to text box with single tab keystrokes. The second issue I mentioned above however stays. Virtualization avoids navigating through all the items.
Handling virtualization
I won't talk about turning off virtualization, as this shouldn't be an option for you as long as there are alternatives. Turning virtualization off will often result in a huge performance hit and is not recommended.
The simplest solution I could find is to handle the GotFocus event of the text box and then use the list box to scroll the current item into view. In a code-behind approach this would look like this:
<TextBox Text="{Binding SomeText, Mode=TwoWay}"
         GotFocus="TextBox_GotFocus"
         Width="100" />
private void TextBox_GotFocus(object sender, RoutedEventArgs e)
{
    TextBox tb = sender as TextBox;
    var item = tb.DataContext;
    MyListBox.ScrollIntoView(item);
}
I like this approach because of all solutions I have tried that one requires the least code and has the least interference with other features. One drawback of this is that the item that is focused is not actually selected, which might cause subtle problems for example when your view model relies on a bound selected item property and the user all of a sudden edits bound properties that don't belong to the selected item. You can change the code behind to actually select the item instead if you prefer that behavior:
private void TextBox_GotFocus(object sender, RoutedEventArgs e)
{
    TextBox tb = sender as TextBox;
    var item = tb.DataContext;
    //MyListBox.ScrollIntoView(item);
    MyListBox.SelectedItem = item;
}
Turning the solution into a behavior
Usually I wouldn't care about these few lines of code in code-behind; as this is completely isolated to the view, I see no reason to put in extra work just to keep the code-behind empty. But I know that some of you very carefully try to avoid any code-behind, so here is, as a bonus, how to turn this into a behavior:
public class SelectItemOnFocusBehavior : Behavior<FrameworkElement>
{
    /// <summary>
    /// Gets or sets the target listbox.
    /// </summary>
    public ListBox TargetListbox
    {
        get
        {
            return (ListBox)GetValue(TargetListboxProperty);
        }
        set
        {
            SetValue(TargetListboxProperty, value);
        }
    }

    /// <summary>
    /// A dependency property for the target listbox.
    /// </summary>
    public static readonly DependencyProperty TargetListboxProperty =
        DependencyProperty.Register("TargetListbox",
        typeof(ListBox),
        typeof(SelectItemOnFocusBehavior),
        new PropertyMetadata(null));

    protected override void OnAttached()
    {
        base.OnAttached();
        AssociatedObject.GotFocus += new RoutedEventHandler(AssociatedObject_GotFocus);
    }

    protected override void OnDetaching()
    {
        AssociatedObject.GotFocus -= new RoutedEventHandler(AssociatedObject_GotFocus);
        base.OnDetaching();
    }

    private void AssociatedObject_GotFocus(object sender, RoutedEventArgs e)
    {
        // when the associated object is focused,
        // we try to select the data item (i.e. the data context)
        // in the list box.
        var listBox = TargetListbox;
        if (listBox != null && AssociatedObject.DataContext != null)
        {
            // alternately: just scroll the item into view
            //listBox.ScrollIntoView(AssociatedObject.DataContext);
            listBox.SelectedItem = AssociatedObject.DataContext;
        }
    }
}
This behavior then can be used in XAML. I'm pasting the whole list box code as a summary here so you don't necessarily have to download the code or merge the previous steps to get a fully working solution.
<ListBox x:Name="MyListBox"
         ItemsSource="{Binding Data}"
         TabNavigation="Local"
         Margin="20"
         Width="200"
         Height="400">
    <ListBox.ItemContainerStyle>
        <Style TargetType="ListBoxItem">
            <Setter Property="IsTabStop"
                    Value="False" />
        </Style>
    </ListBox.ItemContainerStyle>
    <ListBox.ItemTemplate>
        <DataTemplate>
            <TextBox Text="{Binding SomeText, Mode=TwoWay}"
                     Width="100">
                <interactivity:Interaction.Behaviors>
                    <local:SelectItemOnFocusBehavior TargetListbox="{Binding ElementName=MyListBox}" />
                </interactivity:Interaction.Behaviors>
            </TextBox>
        </DataTemplate>
    </ListBox.ItemTemplate>
</ListBox>
Summary
It took an unexpected degree of work to create a user experience similar to the one of a data entry form when using a list box. The problem with this is not that a huge amount of code is required for this, but the fact that most of these things are not very well-known among developers. Starting with the "TabNavigation" property, which admittedly can be discovered with little effort when you search the documentation, to the item container style (a lot of devs are struggling with this and/or don't even know what it is and what they can do with it) to the built-in UI virtualization you have to cope with - I hope I could give you some insights and look ahead for similar situations you'll face in the future.
You can download the source code of the above sample here:
Tags: Controls · Silverlight