
Silverlight 5 Tidbits–Multi-Column Layouts
Published on Thursday, April 21, 2011 12:30:00 PM UTC in
Programming

Edit 2011-12-10: This article is compatible with the final version of Silverlight 5 (5.0.61118.0).
This post is part of a mini series about Silverlight 5:
- Implicit Data Templates
- Multi-Column Layouts
- Markup Extensions
- Multiple Windows
- Trusted Applications
- Incremental Search
- Data Binding
A lot has been said about text and text rendering in Silverlight. People, including myself, were not exactly satisfied with the quality of text rendering in the first versions of Silverlight, especially with small font sizes. Thankfully this situation has improved a lot in later versions, and it will continue to become better in Silverlight 5 with features like Pixel Snapping. Additional options like control over character spacing and the possibility for multi-column layouts seem like a start to reach out to people like typographers and others who like to deep dive into text layout and create more interesting designs. In this post I take a look at multi-column layouts, hopefully including some details you haven't heard about yet.
The situation so far
Up to version 4, the options to layout text in Silverlight are determined by a handful of controls, like the text block, text box and of course the rich text box. All of these are of rectangular shape and are not suited well for multi-column layouts. You could of course manually create some logic to split your text into multiple fragments, but this quickly becomes a complex task, especially if you want to support dynamic layouts that adjust to the current size of the container and/or window. For these scenarios, it is much simpler to revert to third-party controls that support multi-column layouts than to develop an own solution.
What's new in Silverlight 5
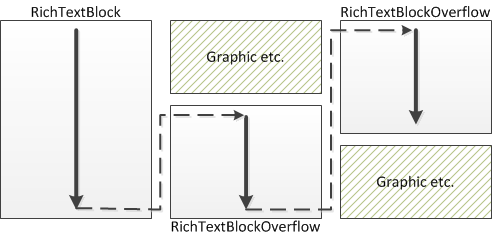
The next version of Silverlight introduces two new controls: the RichTextBlock and RichTextBlockOverflow, both of which display read-only rich text. The idea is simple: you have a master rich text block, but additionally can add as many overflow rich text blocks as you want. The purpose of these additional elements is to receive all text that didn't fit in the previous element. To this end, you chain all elements together, which means each element knows the follow-up element. All the elements are still of rectangular shape, but you are free to size and layout each one of them as you wish.
How it works
Chaining these elements together is actually pretty trivial. The original "RichTextBlock" has a new property named "OverflowContentTarget" that takes the follow-up element, which is a "RichTextBlockOverflow". That type in turn has the same property that allows chaining multiple overflows. If you set up the layout in XAML rather than in code, then it's likely that you use element bindings for this:
<RichTextBlock x:Name="MyRichTextBlock"
               OverflowContentTarget="{Binding ElementName=Overflow1}">

<!-- ... -->

<RichTextBlockOverflow x:Name="Overflow1"
                       OverflowContentTarget="{Binding ElementName=Overflow2}" />
In this example, the original rich text block takes the element "Overflow1" as target for content overflow, which in turn uses "Overflow2" and so on.
Here are some noteworthy things about this concept:
- The master rich text block is in control of all the text and font options. For example you will see that properties like "TextAlignment" or "FontFamily" are missing completely on the overflow elements; instead the values of the master rich text block are used.
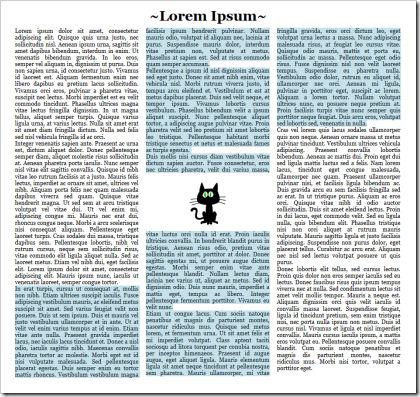
- What I found particularly amazing is that text selection across multiple elements works as you would expect it. Even though composed of different controls, you can select and copy text across multiple columns without even losing formatting. The following image shows a selection across four elements: the master rich text block and three overflow elements, with an additional, unrelated element (the image) in between overflow two and three.
Limitations
In my eyes the limitation of this feature is that the shape of the rich text block and overflows is always rectangular. That makes it a bit hard to let the text flow around arbitrarily shaped objects, because you have to create a lot of overflow elements and approximate the final shape by a number of rectangles. In a perfect world I would have the option to e.g. define something like a clip geometry, and text would automatically be fitted in the resulting shape.
All in all it's a great step forward to have these layout options. They don't live up to professional standards, for example regarding widows and orphans, but it's still a really great addition to Silverlight.
Tags: Silverlight · Silverlight 5