
Screencasts with Open Broadcaster Software
Published on Monday, May 29, 2017 5:00:00 AM UTC in
Tools

This week, I spontaneously wanted to record a code review as a screencast to watch offline for others. In the past, I've recorded a lot of tutorials and screencasts, however the tools I typically use are not quite state of the art anymore (Expression Encoder, for example, is part of my workflow). Coincidentally I remembered that a friend of mine recommended Open Broadcaster Software (or "OBS Studio" for short) recently for streaming and recording, so I decided to take it for a ride and see if it would be able to replace my current tool chain. OBS Studio is open source (see GitHub) and very actively maintained. It also seems to have a large community that posts in their forums, publishes guides and creates plugins for the software. Overall, using it was a great experience right from the beginning, and it left a very professional first impression on me. I won't bore you with another "getting started" guide for this software here--a great amount of good alternatives are out there already. What I want to provide is two things to help you improve using OBS Studio for your screencasts: a) Some configuration advise to set you up for an excellent audio experience, and b) a set of recommendations to get the best quality for your screencasts while keeping the filesize at an absolute minimum. Just to be clear on the scope of this post: I focus on the recording side of things (meaning to produce on demand/offline content); the video encoding details I describe here are particularly irrelevant for streaming scenarios.
2017-06-16: Updated to include more details about reasonable video settings, and a non-standard transcoding setup.
Audio
I'm still using my Samson C03U microphone for recording audio. I've been using this for more than 7 years, and it still provides excellent quality. If you really want to achieve great results, make sure that you get a decent microphone like this - it's actually a lot more expensive than back in 2011 (currently being sold for ~120€), but none of the below tips and tricks will bring you anywhere near even its raw unprocessed quality if you are using a cheap headset or laptop microphone. However, even if you're not willing to invest that much and stick with a more affordable solution, the following details will at least improve audio quality for any setup.
To my surprise, OBS supports quite sophisticated audio filter chains, including VST compatible filters. In its documentation on audio filters, they even link to the excellent ReaPlugs-Plugins, which at the time of writing still come with a license that allows free use. A typical filter chain that I would recommend is, in that order, the following:
- Noise suppression
- Noise gate
- Equalizer
- Compressor
Except for the equalizer, OBS has built-in filters for all of the above. However, I'll mostly focus on the ReaPlugs plugins. Before you start, make sure that you have set up your microphone correctly with Windows. For the Samson in particular, I set the microphone levels to 100 in the recording devices section of the operating system. In addition, I set the pad switch to 0 db and enable the high pass filter on the device itself. Now on to the filters!
Noise Suppression
To cancel background noise, for example like fan noise or other minor noises, add the built-in "Noise Suppression" filter in OBS. Its only option is to set the level itself. The lower the value, the higher the suppression. You may want to be careful with setting too low values to avoid subtle distortion of your audio, but the absolute value depends on your microphone and the boost level you need to get a good signal (if applicable). For the Samson a value of -10 to -15 dB is more than enough, but for microphones with more noise it might be necessary to turn this up to -20 dB or even more.
Noise Gate
A gate filter mutes your microphone when there is no foreground noise (your voice). It has configuration options to control how sensitively it triggers (attack) and how fast it cuts off once the signal stops (release). The idea is that in between your words and sentences, only silence should be recorded (no birds or dog barking or traffic in the background). The UI of the ReaGate VST plugin when opened from OBS looks like this:
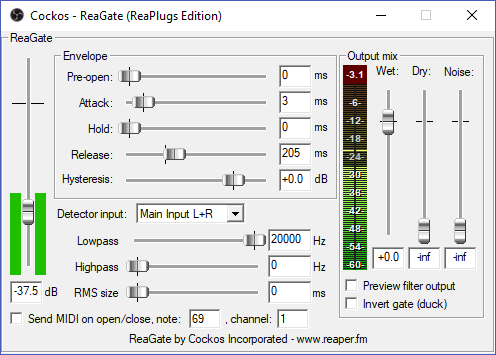
What I would recommend is to increase the release value to >= 200 ms because lower values sometimes make the filter quite noticable (something you want to avoid). The only other thing you need to do is set the level itself, meaning the threshold that triggers the microphone unmute (and mute again). To do this, speak with a low voice and watch the live level meter preview to the left. Adjust the slider so it's below the lowest sound level you want to still record. Be careful though, in my experience some particular sounds (like "f" at the beginning of words, i.e. "four", "free") tend to be not loud enough to trigger the unmute if you set the level too high (which is tempting). Do some tests with different words, sounds and loudness to ensure that everything you want to record triggers correctly.
Equalizer
The ReaEQ plugin allows you to set up an equalizer. Instead of what you may know from other situations, no individual controls per frequency are used here, but a concept of "bands". For each band, you basically set a base frequency you want to manipulate, the desired gain (positive or negative), and a bandwidth that determines the "broadness" (well, the "band") of the manipulation around the base frequency. The various types of bands determine the resulting characteristics. Here are two screenshots, showing a setup of two bands:
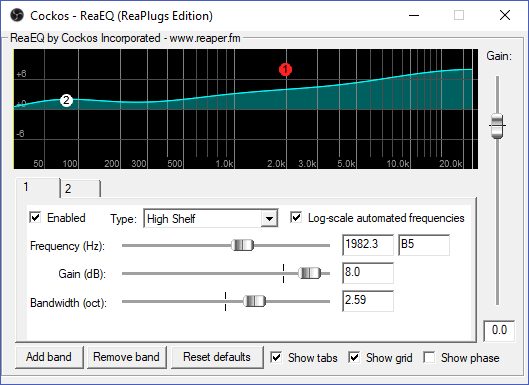
The first screenshot shows a band of type "High Shelf" I set up for a frequency of ~2000Hz, with quite some gain and a bandwidth of ~2.5 octaves. This is to emphasize the frequencies of natural speech a bit.

The second band visible above puts some emphasize on lower frequencies to add some richness to the sound. If you have a low voice, you might not want to do that or even use a different band type like high pass, to filter out some of the lower frequencies altogether.
Adjust these settings to make your voice more understandable and sound clearer.
Be careful though: for microphones with a high input level this may quickly result in distortions. Instead of adding some gain you can always do the opposite and reduce the level for certain bands, to get a similar overall result.
Compressor
A compression filter reduces the dynamic range of the noise that is recorded, thus effectively performing some equalizing on the volume of your audio. If you speak louder in certain situations, the filter adjust the signal levels automatically to keep a more or less identical volume all the time. This helps your listeners so they can understand you better.

Just like the noise gate filter, you can use the attack and release values here to adjust the sensitivity of the filter. The main parameters however are the ratio (how much compression is applied) and the level (threshold) itself. For a microphone like the Samson, a ratio of 5:1 seems enough, but depending on your voice and microphone, it's not uncommon to use higher levels of e.g. 10:1 here. The threshold on the other hand determines when the filter starts to kick in. The trick for this filter is to find a balance that results in similar output levels (visible to the right) for both lower levels and loudly spoken language. The shown values of -20 dB (threshold) and a ratio of 5:1 nicely equalize all normal situations for me, from softly spoken words to louder passages - YMMV of course, just experiment and keep an eye on the output levels. The important part is to make sure it stays below the red levels - if it is clipped, you'll have some resulting distortion in your audio.
There are other options for most filters. For example, you can use the "Wet" control to add some output gain, you can control low and high pass frequencies and more. For a microphone like the Samson it shouldn't be necessary to adjust anything with regards to the output levels, for example, but it might be necessary in other situations. If your input signal for a filter seems too low for example, you can always go back to the previous filter and increase the output level by a few dB there.
Video
The video encoding story with OBS is quite similar to what I've encountered with other tools in the past: the on the fly encoding options can give you some decent results, but if you want the best possible quality (or let's say the best quality by size ratio) you need to perform some post-processing. So, unless you absolutely have no time to wait for a separate transcoding pass, I would highly recommend to follow these steps.
OBS settings
First of all, make sure to set some basic values in OBS itself:
- Make sure that you record at the original resolution, meaning that if your base resolution in the "Video" settings of OBS is 1920x1080 (for screen recording), set the output resolution also to 1920x1080 (full HD).
- Don't go crazy on the frames per second. For most screencasts, a value of 15 is most sufficient here, because typically you do not have video footage or other material that would require a higher framerate.
- In the "Advanced" settings, change the "Color Format" in the "Video" panel to "I444". This kind of downsampling helps reduce the file size a lot, but we will apply it only in the post-processing step (see below), and want to keep the quality as high as possible until then. Make also sure tho set the color space to "709" and to enable the full color range.
- In the "Output" settings, make sure to choose the "Advanced" output mode. What we want is to encode at a very high quality here and perform a separate transcoding step later (see below).
Here are some reasonable output settings, explanation to follow:
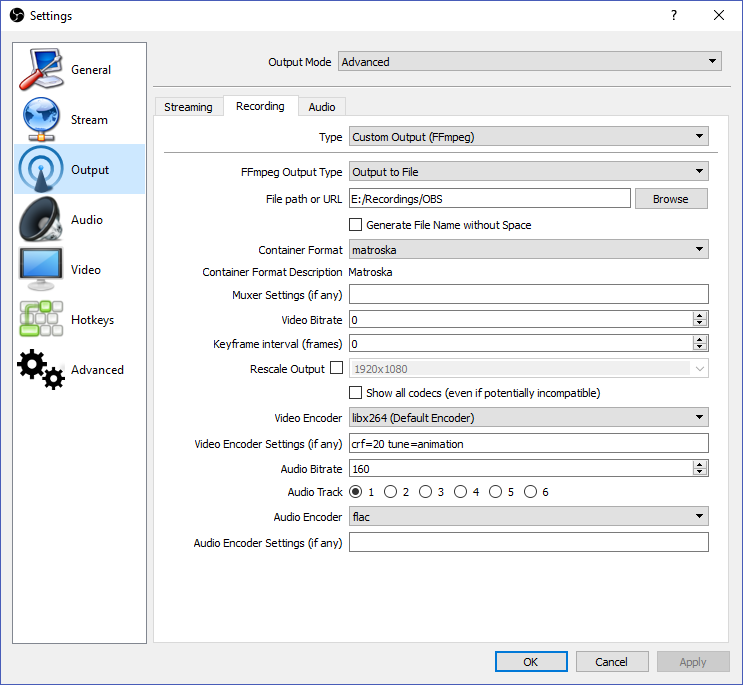
I'm using "Custom Output (FFmpeg)" here because I need to set at least two options that are not accessible through the normal options. But let's go through all relevant details one by one.
The container format is set to "matroska" (MKV), because that's a very robust and flexible option. As video encoder I chose "libx264" (H264). You can try to use the built-in support for hardware encoders here, for example nVidia's NVENC ("h264_nvenc"), but in my experience x264 can be encoded in realtime without any problems on modern hardware with very low CPU load, and I've come across quality issues with hardware encoders in the past.
Now, the important part is to add an "crf=20" video encoder setting. This ensures that all frames are encoded with an equal quality instead of a fixed bitrate, meaning that complex frames get more bits than simpler frames to achieve the same visual quality for both. The absolute quality then is determined by the CRF value. Be careful, lower values mean better quality here. In the screenshot, you can see that I used a value of 20, which actually is a quite high value. 18 is considered "visually lossless" by FFmpeg's standards. The lower the value, the bigger the files, so if you run into trouble with disk space, this is where you would adjust until it works for you. I would expect that values around 20 are sufficient for my typical scenarios.
The second important video encoder setting is "tune=animation", which tries to optimize the encoding for "animation-like" content by setting a few internal options. Since screencasts often consist of large uniformly colored areas (think window content), in my experience this helps with quality a lot.
In the video encoder settings you can add any kind of additional FFmpeg options. For example, you could also add a setting to control the CPU usage preset (e.g. preset=medium). The default value is "medium" and should enable realtime encoding of H264 with low CPU load on all modern machines. Funny detail: it's a bit counter-intuitive that choosing values like "slow" puts more burden on your CPU than going into the "fast" direction. If you think your CPU load is too high when recording, you can set this to "fast" or even "very fast" and higher without any problems. It doesn't affect quality, only file size (the faster the bigger the files because the less optimization on the fly).
Last but not least, don't miss that I set the audio encoder to "flac", which is a lossless audio format. Again, we want to keep the highest possible qualities when recording and only want to optimize for filesize in the following transcoding step.
With these settings, you'll get screencast files in full HD with 15 fps of typically 100-150 MB per minute, meaning you'll need up to 10 GB per hour of recording (for now). If you try and watch the resulting files, you may run into a rather annoying property: seeking within these files can be very slow, and some players like VLC sometimes have trouble shutting those videos down. Sometimes their audio continues to play for ten or more seconds even after the player has been closed, which is irritating at the most. This is not a side effect of our particular settings; in fact, I've seen this with all kinds of OBS's recordings, no matter which settings I chose. But we'll fix that in the next step.
Post-Processing/Transcoding
Behind the scenes, OBS uses - who would've thought that - FFmpeg. For our post-processing, which actually only is another transcoding step, you need to download FFmpeg and extract it to your local computer. It's a command line utility, but don't worry, using it comes down to invoking it with a single statement and some arguments. Of course this step should be performed at the end: after you've done all editing and scene manipulation in OBS, once you are ready to publish the video.
FFmpeg basically gives you everything to open various input formats and encode them to different output formats. I won't go into all the details here, because it has a lot of options and features, and things can become complicated to explain soon. If you're interested in more information, make sure to check out their wiki, for example, which describes everything I tell you here a lot better and more accurately than I ever could.
Before we start, we need to decide on the output format for the video first. There are basically two options that I recommend:
- Either use a combination of H264/AAC for video and audio, packaged in an MKV or MP4 container, or
- Use VP9/Opus in a WebM container
The first combination is probably the most common nowadays, but you may also have heard of the (Google-backed) latter already. In fact, I think that VP9 has some options that make it superior in quality for screencasts, but you can achieve very, very good results with H264 too. Both options are available with FFmpeg out of the box.
H264/AAC/MKV
A typical command line call of FFmpeg to convert to H264/AAC/MKV would look like this:
"c:\Program Files (x86)\ffmpeg\bin\ffmpeg.exe" -i %1 -c:v libx264 -pix_fmt yuv422p -color_range 2 -preset veryslow -crf 30 -tune animation -c:a aac -ac 1 -b:a 48k %1-encoded.mkv
Here's a break-down of the details:
- -i specifies the input file. You can put the input file name here if you like; in the above sample I've used %1 so you can put that line into a .cmd file and simply drag and drop video files onto it.
- -c:v libx264 says that x264 should be used. The options that follow apply to x264.
- -pix_fmt yuv422p -color_range 2 downgrades the setting of the color format we set in OBS (444) to 422; the second argument ensures that dynamic values are not unnecessarily clamped.
- -preset veryslow is the same as the corresponding option in OBS. Since we now have enough time and do not need to encode video in realtime, I choose a slow option to minimize file size as much as possible.
- -crf 30 again is the same as the corresponding option in OBS. Our original quality setting is now downgraded to 30. Depending on how low you're willing to go, you can also try 33 or 35 or even 40; at some point, it really starts looking ugly :).
- -tune animation is a shortcut for a set of arguments to optimize for "animation-like" content. Since most screencasts show windows and the desktop, with lots of uniformly colored areas, they will benefit from this setting too. You can also use the default of "film" here if you think that your screencast does not fit this scenario.
- -c:a aac specifies AAC as audio format. You could also use MP3 or other formats here. The following option applies to that encoder.
- -ac 1 makes sure that the audio is downmixed to mono. If you want to keep stereo sound, remove this option.
- -b:a 48k says to use 48k as bitrate for the audio, which still is a reasonable value for mono sound. If you aim for stereo output, you may use a higher value for good results (like 96k).
- %1-encoded.mkv is the output file name. Again you could specify the real name directly here. For use in a .cmd file I reuse %1 to repeat the input file name and append a suffix here.
These settings will at least cut your resulting file size in half, meaning you can expect something like 2 MB per minute of video with really good visual and audio quality from this. A one-hour screencast with 120 MB in size doesn't sound too bad, right?
To increase quality if you're not satisfied, you would mostly lower the CRF value for video and/or increase the bitrate value for audio, and leave the other settings as-is.
VP9/Opus/WebM
To use FFmpeg with VP9/Opus/WebM, I closely follow the recommendations of the encoding guidelines:
"c:\Program Files (x86)\ffmpeg\bin\ffmpeg.exe" -i %1 -c:v libvpx-vp9 -pix_fmt yuv422p -color_range 2 -pass 1 -b:v 0 -crf 45 -threads 8 -speed 1 -tile-columns 6 -frame-parallel 1 -an -f webm -
"c:\Program Files (x86)\ffmpeg\bin\ffmpeg.exe" -i %1 -c:v libvpx-vp9 -pix_fmt yuv422p -color_range 2 -pass 2 -b:v 0 -crf 45 -threads 8 -speed 1 -tile-columns 6 -frame-parallel 1 -auto-alt-ref 1 -lag-in-frames 25 -c:a libopus -b:a 24k -ac 1 -f webm %1.webm
These look a bit more scary simply because they include some special recommended options from the guidelines, but you really don't have to worry about them. The other part that's unusual here is that it's using two calls instead of one. That is because a two-pass-encoding is used: in a first loop, the source video is analyzed without producing the actual output, simply to determine the optimal parameters for the transcoding, which then are applied in the second pass. The encoding itself is (a lot) slower than with x264, not only because it's using two passes, but also because the actual encoding process is more complex. The first pass is quite fast, but expect the second one to be only slightly faster than realtime, meaning you should roughly plan an hour time to encode an hour of video, depending on your CPU power of course.
Let's go through the options now:
- -i Exactly the same as above: the input file
- -c:v libvpx-vp9 says that VP9 should be used. The options that follow apply to that encoder.
- -pix_fmt yuv422p -color_range 2 downgrades the setting of the color format we set in OBS (444) to 422; the second argument ensures that dynamic values are not unnecessarily clamped.
- -pass 1/2 tells the encoder which pass to do. The first pass produces a log file that is picked up in the second pass automatically.
- -crf 45 is similar to the quality setting of x264. My experience is that you can easily go 10 or more points higher that with x264 and expect the same or better quality from VP9 (meaning the two quality levels are not directly comparable). Even higher settings might still be OK for you, quality decrease is not as dramatic as with x264.
- -b:v 0/-threads 8/-speed 4/1/-tile-columns 6/-frame-parallel 1/-auto-alt-ref 1/-lag-in-frames 25/-an are all internal mumbo-jumbo magic options you should not worry about. Just leave them at the given values.
- -c:a libopus specifies Opus as audio format. The following option applies to that encoder
- -ac 1 makes sure that the audio is downmixed to mono. If you want to keep stereo sound, remove this option.
- -b:a 24k says to use 24k as bitrate for the audio. That is much lower than the value for AAC above, but the format also is more efficient. Use 48k or more if you want to keep stereo sound.
- -f webm %1-encoded.webm is the output format and file name. Again you could specify the real name directly here. For use in a .cmd file I reuse %1 to repeat the input file name and append a suffix here. Please note that for the first pass command line the output file name really is a dash ("-"). That's not a mistake; do not remove the trailing dash from that line.
With the above settings you can expect about the same file size as with the x264 settings above, but the subjective visual quality is better than that. Again your resulting files will be around 120 MB per hour of video with very good and crisp video and audio quality (at full HD with 15 fps).
To increase quality if you're not satisfied, you would mostly lower the CRF value for video (make sure to adjust both the first and second pass) and/or increase the bitrate value for audio, and leave the other settings as-is.
Non-standard alternative: H264/Opus/MKV
Opus is a superior audio format compared to AAC. On the other hand, encoding H264 the way described here is much faster than the VP9 option. In low bitrate situations it may also be superior to VP9 in my experience, in particular with the tune option for "animation" content. If you do not intend to aim for the highest possible compatibility, you can easily combine H264 and Opus in an MKV container using FFmpeg. These files will play back fine in players like Media Player Classic or VLC, but may not be supported on all platforms and other players. Here are my absolut minimum options, to lower file size to the absolut minimum:
"c:\Program Files (x86)\ffmpeg\bin\ffmpeg.exe" -i %1 -c:v libx264 -pix_fmt yuv422p -color_range 2 -preset veryslow -crf 33 -tune animation -c:a libopus -b:a 24k -ac 1 %1-x264-33-opus.mkv
I won't go into the details again, because it's basically a combination of the two alternatives above. For my content, this typically results in less than a megabyte per minute of video, but it will produce visible artifacts for motion. Again you can increase quality by simply lowering the CRF setting.
I hope this is somewhat helpful to you. Feel free to contact me for comments or questions.
Tags: OBS · Screencast