
Integrating Blazor Server and Tailwind CSS - Part 1
Published on Tuesday, July 20, 2021 4:00:00 AM UTC in
Programming
& Tools

This is part 1 of a series of posts I plan on doing on Blazor Server and Tailwind CSS. In this article I cover the basic setup of how to get going to master the moving parts that are involved, and what tools to best use for this. In a later article I'll talk about a bit more sophisticated integration that also covers Blazor's scoped CSS feature, and finally we'll take a look at .NET 6's new hot reload feature and how we can benefit from it too.
Setting up Tailwind
To set up the basics for Tailwind CSS, you best follow the steps outlined in the official Tailwind documentation to install it first. I won't repeat the details here, because it's described really well as an easy to follow step-by-step guide over there. I'm not going to use PostCSS though, meaning you can skip to the part that uses the Tailwind CLI if you also don't intend to do so. In any case, make sure you execute all these steps in your project's root folder, where your .csproj file sits.
When you followed the steps, you'll have at least the following configuration files in the root folder of your project:
package.json: Contains the packages you just installed by following the documentation. You can ignore this for now.tailwind.config.js: This is where you configure Tailwind and where all the configuration happens that I'm going to describe.
Additionally, you should have created a source file for your styles. I put mine in Styles/Styles.css.
Building the main CSS
Add the moment, your Styles/Styles.css file should look pretty empty, just containing the Tailwind directives, and maybe you've added some sample class so you can test out the @apply directive and one of the built-in Tailwind classes:
@tailwind base;
@tailwind components;
@tailwind utilities;

.sample {
    @apply text-red-500;
}
To use this, we need to let Tailwind build the resulting CSS that can be understood by the browser. That result then must be located in the wwwroot folder so it's accessible by the browser. Open a command line and use a command like:
npx tailwindcss -i .\Styles\Styles.css -o .\wwwroot\css\styles.css
The -i and -o options control the input and output files, respectively. You should now have the resulting styles.css file in your wwwroot folder. To actually use it, open the \_Host.cshtml file in the Pages folder of your Blazor project, and add a CSS link tag to the header:
<link href="css/styles.css" rel="stylesheet" />
And that's basically it. Try to use the sample class we added to the styles in any element to test it! And, if you change the source CSS file, simply repeat the build command on the command line, and you should then see the results in your Blazor application once you restart it.
Watching for changes to your CSS
We don't want to manually repeat the build steps every time we do some changes to our CSS. The solution to this typically is to start a so-called watcher process that monitors all relevant source files and then trigger an automated rebuild of the target CSS for us. There are various options to do this, for example using PostCSS, but for this example I'm using Tailwind's own CLI tool.
For this, I first configure Tailwind so a) it knows what files to watch for changes, and b) it uses its new JIT feature to optimize performance for us. Change your tailwind.config.js configuration to read:
module.exports = {
    mode: 'jit',
    purge: {
        enabled: false,
        content: [
            './**/*.razor',
            './**/*.cshtml'
        ]
    },

    //...
The jit mode basically is a reverse tree-shake that only picks up the required features of Tailwind you actually use in a first run. When you combine that with Tailwind's watch feature, you get incremental builds whenever you change something (read the official documentation for more info).
The purge configuration, in particular the content entries, tell Tailwind where to look for usages of its features (and what to watch for changes). It's important to configure this to include your Razor and any other files that you put Tailwind CSS classes into, or else they will be missing from the generated CSS.
You might wonder why we do not list the main Styles.css file here. This is not necessary because it is the input file that we directly pass to the Tailwind CLI, so it's picked up automatically.
The last puzzle piece is to start the said Tailwind watcher. The latter simply is the command we used before, but this time we add -w to indicate that Tailwind should watch the source file and any configured content indefinitely, and incrementally apply any changes. Open your console windows and issue:
npx tailwindcss -i .\Styles\Styles.css -o .\wwwroot\css\styles.css -w
The initial build should only take a moment, depending on the amount of styles and files to process you have of course. Incremental changes then range from 30 to 300ms for me, again depending on the kind and amount of changes.
Now you can make changes to the main CSS, like changing @apply directives on the fly, but you can also edit any Razor file and use Tailwind classes there directly. The watcher will pick up those changes and rebuild the CSS file in your wwwroot folder automatically.
Tailwind's jit feature is in preview. It's a good idea to keep an eye on the console from time to time. I've seen that for unknown reasons the incremental build times can explode, and suddenly your changes do not take 100ms, but 10 or more seconds instead. Simply restarting the watcher helps with that.
Watching for changes in your Blazor app
Now, using the watcher for Tailwind is nice and all, but after every change we have to restart our Blazor app to actually see it in the browser. To improve this situation, we can open another command line window and start a second watcher, but this time for our .NET project. Like so:
dotnet watch run
If you execute this in the folder where your .csproj file sits, the project is build and launched for you, and a similar watcher to the Tailwind one is running indefinitely and watching for changes that need to be applied.
In .NET 5, this merely triggers a rebuild and an automatic browser refresh. This situation will be improved a lot in .NET 6 with hot reload, which I'm going to cover in a later post.
You may ask yourself whether there's a simpler solution than running two watchers in parallel, and if that's really the way to work how it's intended by Microsoft. The short answer is: yes, it is. I asked.
The right tool for the job
One thing you might stumble upon is that when you edit Tailwind CSS in Visual Studio, you'll see something like this:
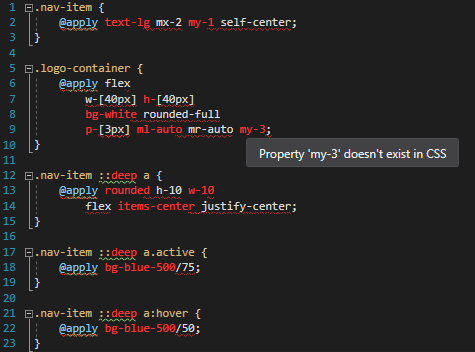
You get those red squiggly-lines all over the place, no Intellisense, and the tooltips yell at you about errors in your (perfectly fine) Tailwind CSS. That's one of the reasons I really recommend using Visual Studio Code to work with Tailwind and your Blazor app. With this setup, the same code and tooltips look like this:
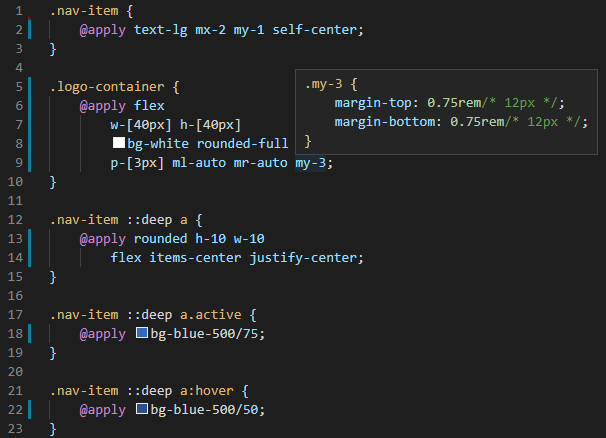
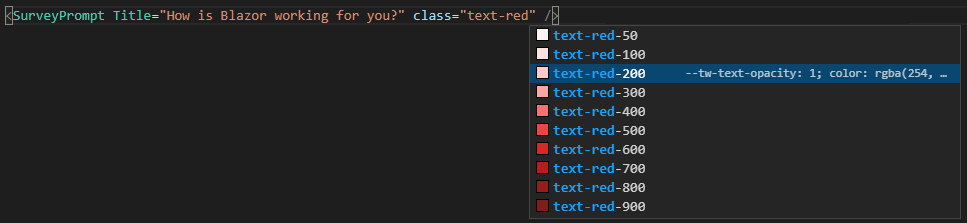
... and you get rich Intellisense support. This even works in .razor files:
The only additional extensions you need for this are:
I also recommend turning off the built-in CSS validation of Code, just as described in the Tailwind CSS extension readme - this avoids false-positives for the @apply directive and others.
In the next part, I'm going to talk about the scoped CSS files of Blazor, and how to support them in the above setup.
Tags: Blazor · Tailwindcss